About Me

My photo
Las Vegas, Nevada, United States
I'm a stay-at-home mother of 2 who loves to bake rich desserts, create healthy dinners, and create homemade crafts. I'm always Hungry for the Homemade! Take some recipes, make them your own, and let me know how it goes.

Friday, July 22, 2011

California Fish Tacos

Even if you don't like fish, you really should try fish tacos. They are so delish, and it's a taco! Meaning, it can be fixed any number of ways to fit any number of tastes. I prefer avocado, cilantro, and cabbage with either grilled or fried red snapper, cod, mahi-mahi, or halibut. Some prefer pico de gallo, shredded cheese or red onion. And we can't forget the crowning glory of the cream sauce! Avocado cream sauce, chipotle cream sauce, or cilantro ranch cream sauce...how do I choose?? Pick what sounds good and try it. I know we have fish tacos at least once a month, so we like to get creative.This was our spread a few nights ago.
My favorite way to prepare the fish comes from CDKitchen's Baja Taco recipe
High in protein and low in fat are always a good combination for a satisfying healthy dinner.

California Fish Tacos
Ingredients
1 lime, juiced
1 pound fresh red snapper fillets, cut into 3 X 1 inch strips (can also use halibut, cod, mahi-mahi)
1/4 cup all-purpose flour
2 tablespoons yellow cornmeal
1 tablespoon chili powder
1 1/2 teaspoon crushed dried oregano leaves
1 teaspoon dried cumin powder
1/2 teaspoon salt
Canola oil
 
8 (7" size) corn or flour tortillas, wrapped in foil and kept warm in a 250 degree F oven
2 cups green cabbage, shredded
quartered limes
purchased or homemade salsa or pico de gallo
sliced avocado
***Chipotle Cream***
1/2 cup reduced-fat sour cream
2 chipotle chilies in adobo, minced
1/2 lime, juiced
1 dash sugar
Salt to taste
for frying


Toss the snapper pieces in the fresh lime juice and marinate for ten minutes. Meanwhile, combine the flour, cornmeal, chili powder, oregano, cumin and salt in a large, shallow bowl.


Heat the canola oil to a depth of 1/2-inch in a large heavy skillet over medium-high heat until a small amount of flour sizzles when flicked into the pan. Dredge the fish in the flour mixture and fry in batches until golden and cooked through, about 7 to 10 minutes per batch. Drain on paper towels and keep warm in the oven until ready to serve.


To serve, place two tortillas on each plate and divide the fish evenly down the middle of each. Top with cabbage and drizzle with Chipotle Cream. Pass limes, salsa and avocado at the table.


Chipotle Cream: Stir all ingredients together in a bowl and add salt to taste. Let stand at least 10 minutes to let flavors blend. (May be made up to 1 day ahead. Refrigerate until ready to serve.)

NUTRITION:

328 calories, 5g fat, 41g carbohydrates, 30g protein per serving.

Thursday, July 21, 2011

Zucchini Boat Pizza

Why is eating something out of an eatable boat so fun? And if it tastes like pizza, count me in! Cooking healthy CAN be easy and so yummy, it just takes some planning. This took me about 15 minutes of prep and 20 minutes in the oven. It's low-carb and full of zucchini, how awesome is that?? Originally from Budget Bytes, I added turkey pepperoni and more parmesan, and skipped the olives and bread crumbs. I <3-ed these!
Here we have a little picture tutorial to show how this works. I used a spoon to scrape out the zucchini and roughly chopped it into bite-sized chunks. Those chunks mixed with the rest of the ingredients to make the filling.
The filling was placed back into the hollowed-out boats and sprinkled with chopped turkey pepperoni and cheese. After about 20 minutes @ 350 degrees, the pizza boats were soft, not slimy, and the cheese perfectly toasted.  These boats were in the harbor, ready to be served! (I'm such a nerd about my food passions, sorry.)
Zucchini Pizza Boats
6 med. zucchini
1-8oz can tomato sauce
1/2 cup grated Parmesan cheese (or 1/4 cup parmesan, 1/4 cup bread crumbs)
1-1/2 tsp Italian seasoning blend
1-2 cups grated mozzarella cheese

  Preheat the oven to 425 degrees. Wash the zucchini well to remove any grit. Slice the zucchini lengthwise and, using a spoon, scoop out the flesh from the center. Leave about one centimeter of zucchini around the edges. Save the scooped out zucchini flesh in a bowl.

Place the scooped out zucchini halves on a baking sheet. Dump the reserved zucchini flesh out onto a cutting board and chop it into smaller pieces. Return the chopped pieces to the bowl and stir in the tomato sauce, bread crumbs (if using), parmesan cheese and Italian seasoning.
 
Refill the zucchini halves with the prepared mixture. Top with mozzarella cheese and pepperoni. Place in the oven and bake for approximately 20 minutes or until the cheese has melted and is slightly browned. The longer the zucchini are in the oven, the softer they'll be so if you like firmer zucchini, bake for a shorter amount of time.

Fresh Cherry Cheesecake Triangles

When cherries are in season, I get a bit giddy at the grocery store. I picked up a few pounds with the intent to bake, and they were gone in 2 days! I may or may not have eaten over half of them myself, but I blame the rest of the family for gobbling them down. Another trip to the store and 2 large bags were in the fridge, one for snacking, one for baking. Problem solved! (as long as I used them ASAP.) I picked a cherry cheesecake bar recipe and instead of the pie-filling it called for, I threw in a cup of fresh, sweet, black, pitted and halved jewels, ahem, I mean cherries. Did I mention these are low-fat/low-sugar and still rich with flavor??!
Cherry-Cheesecake Triangles
Adapted from Delish.com
Ingredients
    Crust
1-1/2 cups graham-cracker crumbs
6 Tablespoons (unsalted) butter or margarine, melted
2 Tablespoons sugar
   Filling
1-1/2 packages (8oz each) light cream cheese (Neufchatel), softened
1/2 cup sugar (I used Splenda, no problems)
2 large eggs
2 teaspoons freshly grated lemon peel (I omitted this)
1-1/2 teaspoons pure vanilla extract
1 cup fresh pitted, halved, ripe black cherries (or 1 cup lite canned cherry-pie filling if you aren't lucky enough to have fresh.)
  Directions
  1. Preheat oven to 350 degrees. Grease a 9-inch square baking pan. Line pan with foil, extending foil over rim; grease foil.
  2. Prepare crust: In bowl, with fork, stir graham-cracker crumbs, butter and sugar until blended. With hand, press mixture onto bottom of prepared pan. Bake 10 minutes. Cool completely in pan on wire rack.
  3. Prepare filling: In small bowl, with mixer at medium speed, beat cream cheese until smooth. Gradually beat in sugar (or splenda). Beat in eggs, lemon peel and vanilla extract just until blended.
  4. Pour cream-cheese mixture evenly over cooled crust. Sprinkle cherries evenly over mixture, gently pressing a few of the cherries into the the cheesecake.
  5. Bake until a toothpick inserted int he center comes out clean, about 45 minutes. Cool completely in pan on wire rack; refrigerate until ready to serve.
  6. When cold, use foil overhang to lift cheesecake out of pan; place on cutting board and peel foil away from sides. Cut lengthwise into 2 strips, then cut each strip crosswise into 2 squares. Cut each square diagonally into quarters.

Shrimp Orzo Salad

Full of some of my favorite summer dinner flavors; cilantro, shrimp, cucumber and feta in a red wine vinaigrette, this salad was a big hit with the family. I hope you love this healthy homemade dinner, too!
I took this recipe from The Brown Eyed Baker, and omitted, added several ingredients.

Shrimp Orzo Salad
Serves 6
Sea salt and olive oil
1/2 lb. (8oz) orzo
1/4 cup freshly squeezed lemon juice
freshly ground pepper
1 lb. cooked large shrimp, peeled
1/2 cup chopped green onion
1 tsp dried dill
1 cup chopped cilantro (or as much as you prefer)
1 cucumber, unpeeled, seeded and medium-diced
1/3 cup small-diced red onion
1/2 lb. (8oz) feta cheese, crumbled or large-diced (I used a block of low-fat feta, tasted great.)
1/2 cup Wish-Bone Red Wine Vinaigrette
  1. Fill a large pot with water, add 1 Tbsp sea salt and a splash of olive oil, and bring the water to a boil. Add the orzo and simmer for 9 to11 minutes, stirring occasionally, until it's cooked al dente. Drain and pour into a large bowl.
  2. Whisk together lemon juice, 2 Tbsp olive oil, 2 tsp sea salt, and 1 tsp black pepper. Pour over the hot pasta and stir well.
  3. Add the thawed shrimp to the orzo and then add the green onion, dill, cilantro, cucumber, red onion, 1 tsp sea salt, and 1 tsp black pepper. Toss well. Add the feta and red wine vinaigrette and stir carefully.
  4. Set aside at room temperature for 1 hour to allow the flavors to blend, or refrigerate overnight. If refrigerated, taste again for seasonings and bring back to room temperature before serving.

Monday, July 18, 2011

A Birthday of Rainbows and Unicorns

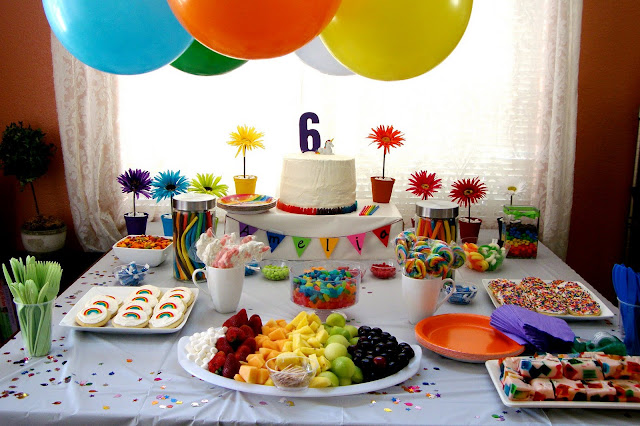
For my daughter's 6th birthday party, she chose the theme of rainbows and unicorns. I loved her creative idea that wasn't the usual cartoon or toy character. AND different than the dog, cat, or pet shop parties of the last few years. I found ideas and inspiration all over the web, and came up with a few ideas of my own.
Birthday banner made with my Cricut machine and tissue paper pom-poms.
Homemade sour cream sugar cookies & a rainbow of fruit platter.
Stained Glass Jell-O squares, monogramed lollies, and white chocolate unicorn pops.


6 layers of rainbow deliciousness!!
Kelly's was the closest horn!

They decorated wooden unicorns found for $1 @Michaels.
The only picture that really shows her rainbow dress (from Target).
Happy Birthday to my little Rainbow Brite!

We can all eat Asparagus again!

         Asparagus isn't a dirty word anymore in our house. My kids aren't heaping their plates with it yet, but at least they eat a few bites of this flavorful and healthy vegetable dish. Time saving tip: Costco sells a bag of frozen pre-cooked brown rice in 4-serving portions, ready in 3 minutes, that makes this recipe so easy and fast.The back of bag had this great recipe.


 Asparagus and Parmesan with Toasted Pine Nuts - serves 3
  1 pouch Rice Expressions Natural Brown Rice (or 2 cups precooked brown rice)
  2 Tablespoons extra virgin olive oil
  8 ounces asparagus, trimmed and cut into 1/2 inch diagonal pieces
  1 teaspoon minced garlic
  1/2 cup grated Parmesan cheese
  2 Tablespoons toasted pine nuts (pignoli)
  Salt and freshly ground black pepper

Cook rice in microwave for 3 minutes.  
Heat oil in a large skillet over medium heat. Add pine nuts as oil heats and cook until brown. Stir frequently and take care not to burn.
Add asparagus to oil as soon as pine nuts brown and stir fry until crisp tender, 1-1/2 minutes; add a pinch of salt and a grinding of black pepper.
Add garlic and stir fry 30 seconds.
Remove rice from microwave and add to the skillet.
Stir fry until heated through, 1 minute. Add cheese and serve.


Sunday, June 26, 2011

My Fav Veggie Side: French String Beans with Bacon


         All side dishes are made better with bacon, and my vegetables are no exception. As a kid I hated green beans, frozen, canned, fresh or steamed. Bleh. As an adult, I've tried to embrace vegetables and make healthy eating taste amazing! Here is my favorite vegetable side that's impossibly easy, healthy, and SO TASTY. If I had these as a kid, I would have changed my mind about green beans sooner!
Costco sells a 2-pk of fresh french string beans, and a large bag of real bacon bits. Easy, easy.
French String Beans with Bacon 
1 - 1.5 lbs fresh french string beans, washed
2 tsp. tub margarine (Smart Balance is my taste preference)
Garlic salt and pepper to taste
2 Tbsp real bacon crumbles (more, if you really love bacon!)
(Possible additions: Almond slivers, blue cheese crumbles, toasted bread crumbs)

 Bring a small amount of water to a boil in a saucepan with a steamer insert. Place string beans in steamer basket and cover, steaming for 7-8 minutes. 
When beans are tender/crisp, place in a bowl and toss with remaining ingredients. Delicious and healthy!